Player Character

Azune Nayar

Player CharacterHumanAlive

A proud and disciplined Arcane Marshal who secretly helps Thjazi Fang prepare for an escape from the gallows.

Overview

Introduction

Azune Nayar is a human Arcane Marshal of the Revolutionary Guard. He stands just over five feet ten inches tall, although his pride and bearing make him appear taller. He is strong, lean and muscular, with medium-brown skin and coppery auburn-brown hair tied back in a braid. A birthmark rises along the right side of his neck, across his face and towards his forehead around one eye. His irises resemble a sunset over the ocean, shifting from deep blue beneath yellow pupils into orange, teal and light grey. He wears the full armour of his station while leaving his arms exposed. The words “Have mercy on those I send you” are tattooed along his right bicep.

Revealed history

Known History

The Falconer’s Rebellion

Years before Thjazi’s execution, Azune followed Thjazi into battle during the Falconer’s Rebellion. Azune remembers believing in the cause strongly enough to die for it and recalls Thjazi carrying him through a battlefield beneath flying arrows and spells.

Story progression

Character Journey

Major events shaping Azune Nayar.

AttackEpisode 1

Attack on Thimble’s Hideout

Seven masked attackers struck Thimble’s hidden apartment, left her critically injured, removed their dead and stole the Stone of Nightsong.

View 16 event details
  • Approximately seven masked attackers entered the hideout expecting resistance.
  • The intruders fought like murderers relying upon surprise and numbers rather than disciplined soldiers.
  • Thimble killed at least three attackers.
  • Thimble escaped into a narrow drainage grate while carrying the genuine escape glyph.
  • The attackers could not reach her inside the grate.
  • Thimble was left unconscious, with a damaged wing and close to death.
  • The attackers removed the bodies of their dead companions.
  • Blood beneath the concealed entrance showed that bodies had been dragged away.
  • The apartment door was shattered and the interior violently searched.
  • Papers, furniture, the mattress and a glass display case were torn apart.
  • Six attackers wore old or damaged boots; one wore noticeably fine footwear.
  • Crow feathers carrying pine resin, alcohol and tobacco scents were found among the traces.
  • The evidence suggests the Crow Keepers but does not prove their responsibility.
  • The Stone of Nightsong and other magical material were removed.
  • The genuine escape glyph remained protected only because Thimble carried it into the grate.
  • Thjazi’s letter to Bolaire remained behind.
ExecutionEpisode 1

The Execution of Thjazi Fang

Thjazi Fang was publicly condemned and hanged beneath the Guardian Wall under the authority of the Chamber of Lords-Advisory.

View 21 event details
  • The execution took place at the gallows beneath the Guardian Wall.
  • Thjazi arrived in an iron-barred prison wagon under a multi-house military escort.
  • House Tachonis soldiers removed him from the wagon in manacles.
  • Azune performed the official magical inspection.
  • Several parts of the crowd cheered when Thjazi appeared.
  • The Sundered Houses used trumpets to silence or overpower the crowd’s response.
  • A House Tachonis herald proclaimed the sentence.
  • Thjazi was accused of arcanism, theft, skulduggery, murder and sedition.
  • The Chamber of Lords-Advisory authorised the sentence to the Revolutionary Council.
  • The Photarch spoke on behalf of the Candescent Creed and House Halovar’s changing religious order.
  • Wicander expected the Photarch to commute the sentence to life imprisonment.
  • The Photarch privately told Wicander that Thjazi had to die.
  • Thjazi and Halandil shared final words across the crowd.
  • Thjazi saw something in the sky and became visibly panicked.
  • Thjazi asked Halandil to help Murray and the Penteveral and said paint waited with Bolaire.
  • Thjazi asked Halandil to tell Thimble not to be scared.
  • Thjazi declared that the authority condemning him would fall and that he could still hear the falcon’s cry.
  • The executioner pulled the lever before Thjazi completed his final mental message.
  • The escape intervention did not remove Thjazi.
  • Thjazi died by hanging.
  • This was the first execution in Dol-Makjar carried out exclusively under the authority of the Chamber of Lords-Advisory.
Rescue AttemptEpisode 1

The Failed Rescue of Thjazi Fang

A coordinated magical extraction intended to remove Thjazi from the gallows collapsed after Thimble was attacked, Cyd disappeared and a false magical signature appeared upon the prisoner.

View 16 event details
  • Halandil spent weeks pleading, bargaining and arranging an intervention to save Thjazi.
  • Thimble was to finish a ceramic escape glyph and conceal it inside Thjazi’s coat.
  • Azune was assigned to inspect Thjazi and intended to conceal or manipulate the magical scan.
  • Breaking the glyph would transport Thjazi into a waiting wagon.
  • Casimir supplied the wagon.
  • Cyd Pridesire was supposed to position and drive the wagon.
  • Thaisha and Occtis were to meet Thjazi outside Dol-Makjar and finish the extraction.
  • Wicander was intended as a political or legal failsafe if the operation failed.
  • Masked attackers entered Thimble’s hideout before she could deliver the glyph.
  • Thimble saved the completed glyph by carrying it into the drainage grate.
  • Cyd was absent and remained missing during Episode 1.
  • Azune nevertheless detected conjuration and illusion magic at the back of Thjazi’s coat.
  • Azune signalled the apparent ward’s location to Thjazi.
  • The genuine glyph never reached Thjazi.
  • The executioner pulled the lever and no magical extraction occurred.
  • The later discovery of the genuine glyph proves that the detected object was something else or that the scan was deceived.
RebellionEpisode 1

The Falconer’s Rebellion

A rebellion led in part by Thjazi Fang, during which Azune Nayar and Teor Pridesire fought beside him.

View 9 event details
  • Thjazi Fang fought as a leader during the rebellion.
  • Azune Nayar followed Thjazi into battle and believed the cause was worth dying for.
  • During one battle, Thjazi carried an injured Azune while calling for a medic as arrows and spells crossed overhead.
  • Teor Pridesire served beside Thjazi during the rebellion.
  • Teor and Azune recognise one another as former comrades from the conflict.
  • The people of the Rookery later remembered Thjazi as a hero of the rebellion.
  • Thjazi suffered a tongue injury during the conflict.
  • Aranessa says Thjazi took up the banner of rebellion two years after their marriage.
  • Aranessa’s grandfather sided with the Halovars and Tachonises against Thjazi’s cause.
Mourning CeremonyEpisode 1

The Farramh of Thjazi Fang

Thjazi’s family and community gathered at the Fang home for an orcish Farramh beginning on the day of his death.

View 13 event details
  • A Farramh begins on the day of death or as soon afterwards as possible.
  • The deceased is placed for viewing so family and community can gather.
  • Shadia prepared the Fang home before the body arrived.
  • Azune carried Thjazi inside and placed him for viewing.
  • The body was covered with a white Candescent funerary sheet before the family arranged their own rites and offerings.
  • Loza performed an Old Path farewell beside the body.
  • Guests brought food, flowers, liquor, coins, jewellery and personal treasures.
  • The gathering included family, veterans, arcanists, occultists, nobles and criminal associates.
  • Thjazi’s scimitar was returned to Halandil during the ceremony.
  • Representatives of House Halovar and the Candescent Creed entered despite hostility from the household and neighbourhood.
  • Aranessa mourned her estranged husband and confronted House Halovar’s claims.
  • Vaelus arrived seeking the Stone of Nightsong and was persuaded to respect the grieving family.
  • The ceremony remained underway when Episode 1 ended.
View Complete Campaign Timeline →
Personal connections

Relationships

Bonds, loyalties and conflicts as they develop across the campaign.

Former Commander and Soldier

Character
MilitaryYour role: Former Soldier And ComradeDeceased Counterpart

Azune once followed Thjazi into battle and is now participating in the secret attempt to save him from execution.

Latest development · Episode 1Azune Carries Thjazi Home

Echoing the battlefield memory, Azune carries Thjazi’s body into the Fang home and gently restores a peaceful expression to his face.

View full relationship evidence →
View 2 earlier developments
Episode 1A Final Attempt at Rescue

Azune uses his official inspection to contact Thjazi secretly, explain the escape plan and signal the location of the supposed ward. Before approaching the gallows, Thjazi apologises for the distance he kept from Azune.

Episode 1Thjazi Carried Azune Through Battle

Azune remembers Thjazi carrying him through a battlefield during the Falconer’s Rebellion while spells and arrows flew overhead.

Lieutenant and Arcane Marshal

Faction
OrganisationalYour role: Lieutenant And Arcane MarshalActive

Azune serves the Revolutionary Guard as a Lieutenant and Arcane Marshal and directs Enquirers Horace and Groto.

Latest development · Episode 1Assigned to Inspect Thjazi Fang

The Revolutionary Guard assigns Azune to scan Thjazi for magical residue before the execution.

View full relationship evidence →

Veterans of the Falconer’s Rebellion

Player Character
MilitaryYour role: Former Comrade And FriendHistorical

Teor and Azune fought together during the Falconer’s Rebellion and recognise one another immediately despite the years between their meetings.

Latest development · Episode 1Cyd Failed to Appear

Azune reveals that Teor’s younger brother Cyd was supposed to participate in Thjazi’s rescue. Neither man has seen him, prompting Azune to leave and investigate.

View full relationship evidence →
View 2 earlier developments
Episode 1Reunited at the Farramh

Teor and Azune greet one another by clasping forearms. Both acknowledge that they have serious questions concerning Thjazi’s death.

Episode 1Azune Offers to Join Teor

Azune tells Teor that he wants to be included in any action Teor intends to take that night. Both believe that serious questions remain concerning Thjazi’s execution.

Rescue Allies and Investigators

Player Character
OperationalYour role: Rescue Ally And InvestigatorActive

Azune and Occtis share responsibility for reconstructing the failed rescue and finding Thimble.

View full relationship evidence →

Friends in the Rescue Plan

Player Character
PersonalYour role: Friend And Rescue AllyActive Bereaved

Azune regards Thimble as a friend, trusts her role in the rescue and later delivers Thjazi’s final message to her.

View full relationship evidence →
Unanswered questions

Mysteries

Open and resolved questions connected to Azune Nayar.

OpenRaised in Episode 1

What Did Thjazi See in the Sky?

What did Thjazi see above the Guardian Wall, and why did it frighten him?

Moments before his execution, Thjazi looks above the Guardian Wall and changes from confidence to visible panic.

Latest developmentThjazi Sees Something Above the Wall

Thjazi looks towards the sky. Whatever he sees causes his confident expression to change into panic, but Halandil cannot identify the cause from within the crowd.

Partially ResolvedRaised in Episode 1

How Was Thjazi’s Rescue Sabotaged?

Who compromised the rescue, what did Azune detect on Thjazi, and is Cyd’s disappearance part of the same sabotage?

The immediate failure is known: Thimble was attacked before delivering the genuine glyph, while a different magical signature was placed on Thjazi.

Latest developmentThe Full Rescue Chain Is Reconstructed

The survivors establish that Thimble would plant the glyph, Azune would manipulate the inspection, Cyd would position Casimir’s wagon, and Thaisha and Occtis would complete the extraction. The plan failed before its first physical stage because Thimble was attacked before delivering the glyph.

OpenRaised in Episode 1

Where Is Cyd Pridesire?

What prevented Cyd from reaching the rescue, and where is he now?

Cyd was responsible for positioning the rescue wagon but never appeared, and neither Teor nor Azune knows where he is.

Latest developmentCyd Was Supposed to Position Casimir’s Wagon

The survivors establish that Cyd’s precise role was to move Casimir’s wagon into position so that Thjazi could teleport inside it. Cyd’s disappearance therefore removed a critical stage of the extraction plan.

ResolvedRaised in Episode 1

Where Was Thimble?

Where did Thimble go after failing to appear at the execution?

After the rescue failed, Thimble was found critically injured inside a drainage grate beneath her ransacked hideout.

Latest developmentThimble Is Found

Teor follows the scent of honeysuckle and a fading otherworldly light to a drainage grate, where he finds Thimble unconscious and critically injured.

OpenRaised in Episode 1

Who Attacked Thimble’s Hideout?

Who ordered the attack, who wore the fine boots, and how did the attackers learn the hideout and timing?

Seven masked attackers struck at the exact time Thimble was preparing the rescue glyph, removed their dead and stole magical objects.

Latest developmentThe Stone of Nightsong Was Taken

The attackers removed the Stone of Nightsong and other magical objects from the hideout. It remains unclear whether stealing the relic was their primary objective or opportunistic theft after attacking Thimble.

OpenRaised in Episode 1

What Happened to Dol-Makjar’s Revolution?

How did Dol-Makjar change from the city Teor remembers, and what remains of its revolutionary institutions and ideals?

Returning veterans find a revolutionary city transformed by Sundered House power, the Candescent Creed and an expanding Chamber authority.

Latest developmentHalovar and Tachonis Continue to Grow Stronger

Aranessa warns that the two Sundered Houses are gaining power while faerie-linked influence diminishes.

Transcript-backed claims

Evidence Ledger

Transcript-backed statements concerning Azune Nayar, with testimony and uncertain claims kept distinct from direct depiction.

62
42 Confirmed18 Reported1 Believed1 Suspected
ConfirmedNarration00:04:57

Azune Nayar appears human.

Source
Azune’s Final Attempt · Azune Nayar
ConfirmedCharacter Introduction00:04:57

Azune Nayar is an Arcane Marshal of the Revolutionary Guard in Dol-Makjar.

Source
Azune Nayar · Azune’s Final Attempt · Azune Nayar
ConfirmedNarration00:04:57

The words “Have mercy on those I send you” are tattooed along Azune Nayar’s right bicep.

Source
Azune’s Final Attempt · Azune Nayar
ConfirmedNarration00:06:28

Azune Nayar followed Thjazi Fang into battle years before Thjazi’s execution.

Source
Azune’s Final Attempt · Thjazi Leaves the Prison Wagon
ConfirmedCharacter Introduction00:07:24

Azune is officially assigned to scan Thjazi for magical residue before the execution.

Source
Azune Nayar · Azune’s Final Attempt · Azune Secretly Contacts Thjazi
ConfirmedDirectly Depicted Action00:07:24

Azune uses his official magical inspection as cover to cast Message and communicate privately with Thjazi.

Source
Azune Nayar · Azune’s Final Attempt · Azune Secretly Contacts Thjazi
ReportedCharacter Claim00:08:43

Azune tells Thjazi that someone placed a delicate ward upon him earlier that day which is intended to transport him away when pressure is applied.

Source
Azune Nayar · Azune’s Final Attempt · The Escape Plan
Azune accurately reports the rescue plan, but the object actually hidden on Thjazi is later shown not to be the genuine glyph.Contradicted By Later Evidence
ReportedWitness Observation00:10:09

Azune detects traces of conjuration and illusion magic hidden near the back of Thjazi’s coat and within reach of his manacled hands.

Source
Azune Nayar · Azune’s Final Attempt · Azune Detects the Escape Magic
ConfirmedDirectly Depicted Action00:10:50

Azune signals to Thjazi that the detected magic is located near the small of his back.

Source
Azune Nayar · Azune’s Final Attempt · Azune Signals the Ward’s Location
ReportedCharacter Testimony00:11:03

Thjazi apologises to Azune for the distance he kept between them.

Source
Thjazi Fang · Azune’s Final Attempt · Set Some Fires of Your Own
ReportedCharacter Testimony00:11:03

Thjazi tells Azune to set some fires of his own when the time comes.

Source
Thjazi Fang · Azune’s Final Attempt · Set Some Fires of Your Own
ConfirmedDirectly Depicted Magic00:17:09

Halandil’s bardic magic connects with the residue of Azune’s Message spell, allowing Halandil and Thjazi to communicate mentally.

Source
The Execution of Thjazi Fang · Halandil Connects to Thjazi
Show 50 more evidence records
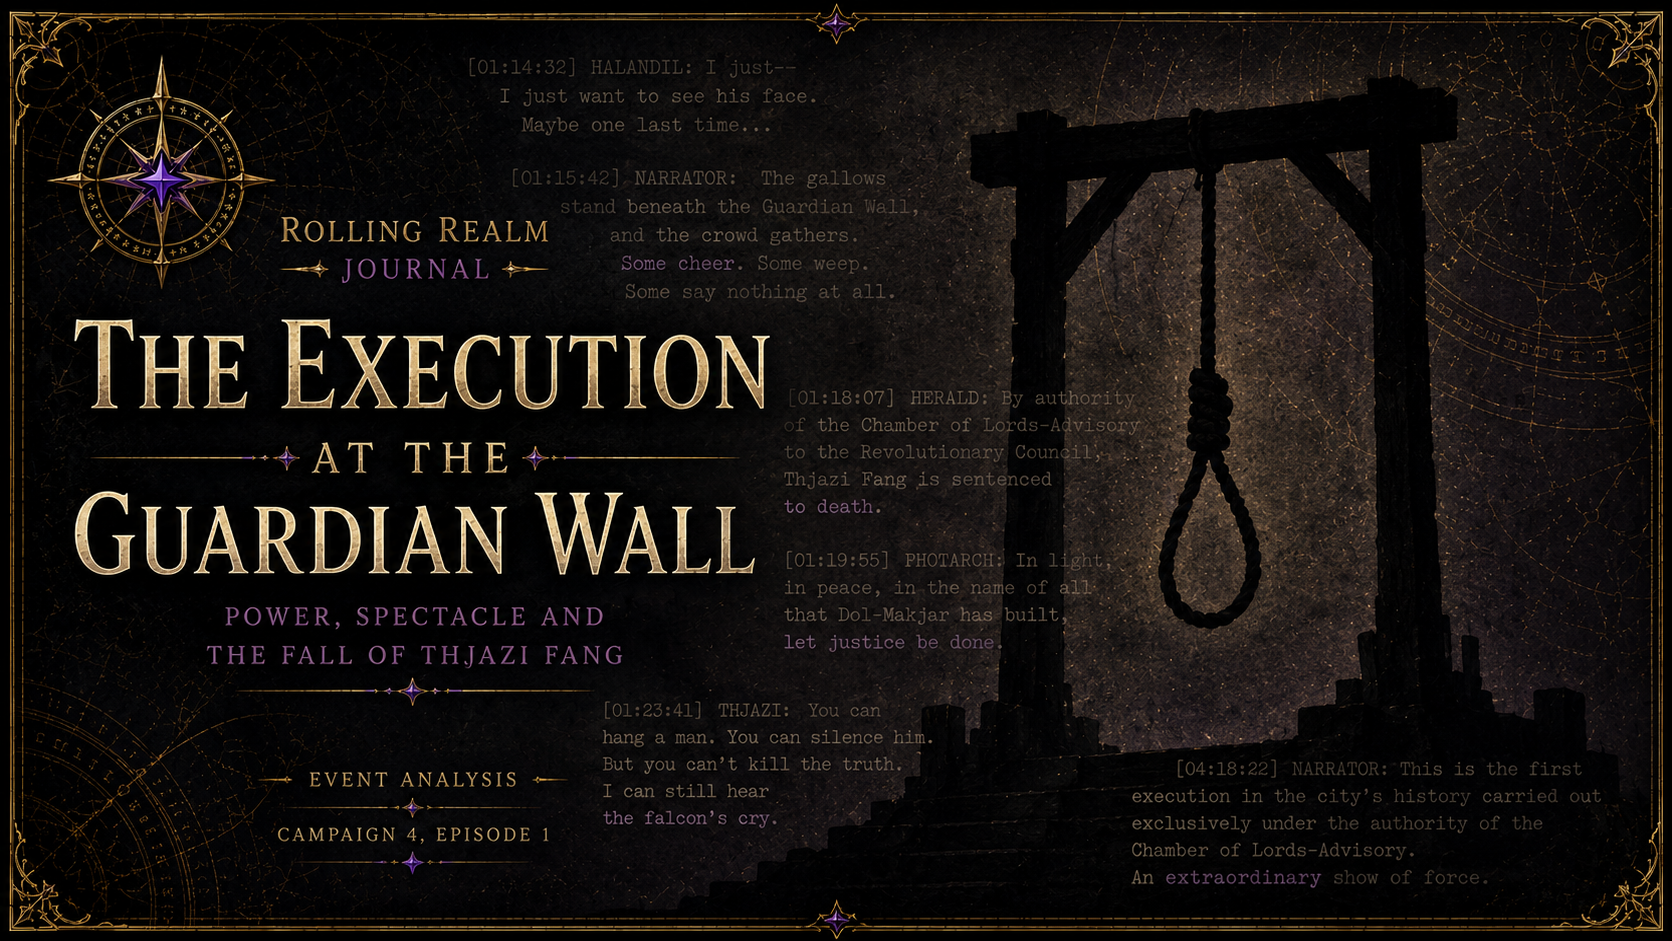
ReportedCharacter Testimony00:38:56

Following the failed rescue, Thaisha says that they need to speak with Azune and Thimble.

Source
Thaisha Lloy · Thaisha and Occtis Arrive · The Rescue Went Wrong
ConfirmedDirectly Depicted Action00:47:42

Azune personally lifts Thjazi’s body and carries him into the Fang home.

Source
Azune Brings Thjazi Home · Azune Carries Thjazi Himself
ReportedCharacter Recollection00:48:44

During the Falconer’s Rebellion, Thjazi carried Azune through a battlefield while arrows and spells flew overhead.

Source
Azune Nayar · Azune Brings Thjazi Home · A Memory of the Falconer’s Rebellion
ReportedCharacter Recollection00:49:14

Thjazi was a young and powerful battlefield leader during the Falconer’s Rebellion.

Source
Azune Nayar · Azune Brings Thjazi Home · The Leader Azune Remembered
ReportedCharacter Recollection00:49:14

Azune believed the cause of the Falconer’s Rebellion was worth dying for.

Source
Azune Nayar · Azune Brings Thjazi Home · The Leader Azune Remembered
ConfirmedDirectly Depicted Action00:49:59

Azune gently smooths Thjazi’s features so that his family will see him appearing to be at rest.

Source
Azune Brings Thjazi Home · Azune Restores Thjazi’s Repose
ReportedCharacter Recollection01:11:05

Azune and Teor fought together during the Falconer’s Rebellion.

Source
Azune Nayar, Teor Pridesire · Teor and Loza Pay Their Respects · Azune Recognises Teor
ConfirmedNarration01:11:36

After the execution, the Sundered Houses left the Revolutionary Guard to recover and transport Thjazi’s body.

Source
Teor and Loza Pay Their Respects · A City Teor No Longer Recognises
ReportedCharacter Testimony01:16:18

When Teor and Azune reunite, both admit that they have questions concerning Thjazi’s execution.

Source
Teor Pridesire, Azune Nayar · Teor and Loza Pay Their Respects · Teor and Azune Reunite
ReportedCharacter Testimony01:42:12

Azune welcomes Teor as an old friend and remembers their years fighting side by side.

Source
Azune Nayar · Questions Among Old Soldiers · Old Friends Speak Privately
ConfirmedDirectly Depicted Action01:42:12

During his private conversation with Teor, Azune repeatedly watches the direction in which Halandil withdrew.

Source
Questions Among Old Soldiers · Old Friends Speak Privately
ReportedCharacter Testimony01:42:53

Azune tells Teor that he wants to be included in any action Teor intends to take that night.

Source
Azune Nayar · Questions Among Old Soldiers · Azune Wants a Part in What Comes Next
BelievedCharacter Belief01:44:43

Azune believes that someone should be made to answer for what happened to Thjazi.

Source
Azune Nayar · Questions Among Old Soldiers · Someone Should Answer for Thjazi’s Death
ReportedCharacter Testimony01:45:17

Azune has not seen Cyd and leaves the conversation after learning that Teor has not found him either.

Source
Azune Nayar · Questions Among Old Soldiers · Cyd Is Missing
ConfirmedDirectly Depicted Event01:57:00

Azune pulls Occtis aside and sends a message directly into his mind, saying that they must determine what went wrong with their plan.

Source
Finding the Broken Link · Azune Contacts Occtis Privately
ConfirmedDirectly Depicted Event01:57:13

Azune and Occtis agree that Thaisha is currently too intoxicated to help them reconstruct the failed rescue.

Source
Finding the Broken Link · Thaisha Is Unable to Reconcile the Plan
ConfirmedDirectly Depicted Event01:57:26

Occtis tells Azune that the situation has become more complicated because Wicander Halovar is present at the Farramh.

Source
Finding the Broken Link · Halovar’s Presence Complicates Matters
ConfirmedDirectly Depicted Event01:57:33

Azune and Occtis agree that they must locate Thimble. Neither of them saw her during Thjazi’s execution.

Source
Finding the Broken Link · They Need to Find Thimble
ConfirmedDirectly Depicted Event01:57:48

Azune says that he performed the planned magical scan and, as far as he knows, Thimble successfully completed her part of the rescue.

Source
Finding the Broken Link · Azune Believes Thimble Did Her Part
ConfirmedDirectly Depicted Event01:58:22

Azune tells Occtis that Teor’s brother Cyd was supposed to help with the rescue but has not been seen by Teor since his return.

Source
Finding the Broken Link · Cyd Was Supposed to Help Them
ConfirmedDirectly Depicted Event01:58:41

Azune and Occtis know the secret flophouse where Thimble had been constructing the escape glyph. It lies two neighbourhoods south of the Rookery in the working-class district known as the Tanners.

Source
Finding the Broken Link · Thimble’s Secret Hideout
ConfirmedDirectly Depicted Event01:59:12

Occtis proposes travelling to the hideout to see whether Thimble is there. Azune agrees and asks Occtis to meet him outside.

Source
Finding the Broken Link · Azune and Occtis Prepare to Search
ConfirmedDirectly Depicted Event01:59:48

Azune asks Teor whether he wants answers and tells him to meet outside in five minutes, where Azune may be able to lead him to them.

Source
Finding the Broken Link · Do You Want Some Answers?
ConfirmedDirectly Depicted Event02:01:27

Azune, Occtis, and Teor meet outside the Fang home. Occtis confirms that he knows the house where Thimble was working, and the three depart through Dol-Makjar as rain begins to fall.

Source
Finding the Broken Link · The Search for Thimble Begins
ConfirmedDirectly Depicted Event02:02:21

Azune, Occtis, and Teor enter the Tanners as rain begins to fall. The district is filled with the smell of curing leather and macerating flesh from its many tanneries.

Source
Ransacked Hideout · Into the Tanners
ConfirmedDirectly Depicted Event02:02:59

Azune leads the group to a wall marked with the name Ograhmson Leather Tannery. He knows that the letter S conceals the entrance to Thimble’s hidden apartment.

Source
Ransacked Hideout · The Ograhmson Leather Tannery
ConfirmedDirectly Depicted Event02:03:20

Before entering the hideout, Azune warns Teor that Thimble may be in danger and that some part of the rescue plan may have gone badly wrong.

Source
Ransacked Hideout · Thimble Might Be in Trouble
ConfirmedDirectly Depicted Event02:04:28

Azune touches a small child’s bracelet hanging from a necklace around his neck and whispers that he is not alone. A spectral defensive form briefly emerges from him as he magically fortifies himself.

Source
Ransacked Hideout · I’m Not Alone
ConfirmedDirectly Depicted Event02:06:04

Teor notices fresh blood beneath the hinge of the secret door. Someone has attempted to clean it away hastily.

Source
Ransacked Hideout · Fresh Blood Beneath the Door
ConfirmedDirectly Depicted Event02:06:24

The investigators find a large amount of blood descending the hidden staircase. The marks strongly suggest that one or more bodies were dragged out of the hideout.

Source
Ransacked Hideout · Bodies Were Dragged Away
ConfirmedDirectly Depicted Event02:07:12

The concealed apartment has been violently searched. Its door is shattered, papers are soaked in blood, the mattress has been cut open, and a broken mirror and overturned furnishings show that a serious struggle occurred.

Source
Ransacked Hideout · The Hideout Has Been Torn Apart
ReportedWitness Observation02:07:46

Azune and Teor recognise from the signs of the struggle that whoever was fought inside the hideout could not easily have been physically thrown around by those defending it.

Source
Azune Nayar · Ransacked Hideout · The Occupants Faced a Powerful Attacker
ConfirmedNarration02:08:18

The investigators recognise Thjazi’s handiwork throughout the concealed apartment. He had transformed part of the tannery into the secret hiding place, although much of his work has now been damaged.

Source
Ransacked Hideout · Thjazi Built the Hiding Place
ConfirmedDirectly Depicted Event02:09:04

Teor clears the furniture from a narrow drainage grate and discovers Thimble lying unconscious within a space only someone of her tiny size could enter.

Source
Ransacked Hideout · Thimble Is Found
ConfirmedDirectly Depicted Event02:09:16

Thimble is a four-inch-tall pixie with short brown hair who appears older than Teor remembers. Her dark-green clothes are tattered, her normally bright spring-green wings are muted, one wing is bent, and she lies unconscious with her needle swords scattered beyond her reach.

Source
Ransacked Hideout · Thimble Lies Unconscious
ConfirmedDirectly Depicted Event02:10:08

A small ceramic rune lies concealed beside Thimble inside the drainage grate. It is small enough to have been slid through the narrow opening with her.

Source
Ransacked Hideout · A Ceramic Rune Beside Thimble
ConfirmedDirectly Depicted Event02:31:49

Azune, Occtis, and Teor tell Thimble that the rescue failed and Thjazi has been executed. Thimble realises that night has fallen and breaks down because she never had the chance to say goodbye.

Source
Thimble Between Life and Death · Thjazi Is Gone
ConfirmedDirectly Depicted Event02:33:00

Azune tells Thimble that he communicated with Thjazi before his death and that Thjazi wanted her to know she had done well and that he was proud of her.

Source
Thimble Between Life and Death · He Was Proud of You
ConfirmedDirectly Depicted Event02:33:33

Thimble says that people entered the hideout and attacked her before she could deliver the glyph. She is immediately disturbed by the question of how they knew about the plan.

Source
Thimble Between Life and Death · They Attacked Me
ReportedWitness Observation02:33:47

Azune examines the ceramic rune and confirms that it is the completed escape glyph Thimble was preparing. It carries exactly the expected conjuration and illusion magic.

Source
Azune Nayar · Thimble Between Life and Death · The Glyph Is Perfect
ReportedWitness Observation02:34:51

Azune realises that he never directly saw the object hidden inside Thjazi’s jacket. His magical scan detected the expected conjuration and illusion aura, but the genuine glyph is still inside the hideout.

Source
Azune Nayar · Thimble Between Life and Death · What Did Azune Scan?
ConfirmedDirectly Depicted Event02:35:28

Because the genuine escape glyph remains with Thimble, Azune concludes that a different object carrying the same magical signatures must still be concealed upon Thjazi’s body. The investigators decide that they need to return to the Fang home.

Source
Thimble Between Life and Death · Something Is Still on Thjazi’s Body
ConfirmedDirectly Depicted Event02:36:48

Azune’s assigned role was to manipulate the magical inspection so that the escape glyph would not be reported as magic upon Thjazi.

Source
Reconstructing the Failed Rescue · Azune Was to Throw the Scan
ReportedWitness Observation02:37:33

Marks upon the grate show that Thimble fell beyond the attackers’ reach. Unable to find her, they ransacked the apartment, removed the bodies, and departed.

Source
Thimble · Reconstructing the Failed Rescue · The Attackers Could Not Find Thimble
ConfirmedDirectly Depicted Event02:39:21

An imposing figure appears in the entrance to Thimble’s hideout. Occtis does not recognise him, but Thimble, Teor, and Azune immediately know the man as Kattigan Vale.

Source
Kattigan and Wulferic · A Ghost Appears in the Doorway
ConfirmedDirectly Depicted Event02:41:02

Kattigan’s imposing entrance is weakened when he stumbles against the doorway, revealing that he has been drinking. Recovering quickly, he jokes that he expected a funeral rather than a reunion.

Source
Kattigan and Wulferic · Not a Funeral, but a Reunion
ReportedWitness Observation02:44:27

Kattigan admits that he followed Teor, Azune, and Occtis from the Fang home to the Tanners, mocking them as noisy, loud, clumsy, and easy to track even while he was half drunk.

Source
Kattigan Vale · Kattigan and Wulferic · Kattigan Followed Them
ConfirmedDirectly Depicted Action02:46:32

After the execution, Kattigan follows Teor and the others to the Fang home. He considers entering the Farramh but turns away when the gathering grows louder and more celebratory. When the investigators emerge, he follows them instead.

Source
Kattigan and Wulferic · Kattigan Watches the Farramh from Outside
SuspectedDirectly Depicted Event02:55:05

Thimble cannot understand how the attackers discovered the secret hideout or arrived at precisely the right time. She concludes that something or someone betrayed the rescue operation.

Source
The Crow Keepers’ Attack · Something Betrayed Us
ConfirmedDirectly Depicted Event02:57:41

After learning that Thjazi’s body is at Halandil’s home, Thimble tearfully asks the others to take her there.

Source
The Crow Keepers’ Attack · Can We Go See Him?
Source-linked viewing guide

Scene Appearances

Follow Azune Nayar through the campaign and jump directly to relevant scenes and moments.

Select a scene to begin

The shared player loads only when you choose a scene or source-linked moment.

Campaign 4, Episode 1

Episode 1

13 scenes
01
Rescue Attempt

Azune’s Final Attempt

04:5711:406 min 43 sec

Arcane Marshal Azune Nayar secretly contacts Thjazi Fang, confirms the apparent presence of an escape ward and signals where Thjazi must break it to flee the gallows.

8 relevant moments
02
Execution

The Execution of Thjazi Fang

11:4018:467 min 6 sec

Thjazi Fang is publicly condemned beneath the Guardian Wall. After sharing a final connection with Halandil and issuing several urgent instructions, he delivers a defiant final statement and is hanged.

1 relevant moment
03
Arrival

Thaisha and Occtis Arrive

37:0346:008 min 57 sec

Thaisha Lloy and Occtis arrive at the Fang home after the failed attempt to rescue Thjazi. Thaisha reunites with Halandil and their daughter Shadia, while Occtis reveals that Thjazi helped him when he was a child.

1 relevant moment
04
Body Return

Azune Brings Thjazi Home

46:0056:1810 min 18 sec

Azune brings Thjazi’s body to the Fang home, carries his former commander inside and helps place him for the beginning of the Farramh.

6 relevant moments
05
Mourner Arrival

Teor and Loza Pay Their Respects

56:181:17:2421 min 6 sec

Teor Pridesire and Loza Blade arrive at the Fang home after witnessing Thjazi’s execution. Loza performs an Old Path farewell beside Thjazi’s body, while Teor reunites with Azune and questions what has happened to Dol-Makjar.

3 relevant moments
06
Tense Arrival

Light Enters the Farramh

1:33:031:41:308 min 27 sec

Wicander Halovar and Tyranny enter the Fang home carrying Thjazi’s scimitar. An old cold-iron ward reacts to Tyranny’s presence, Halandil withdraws from Wicander, and Tyranny receives an awkward introduction to mortal funeral etiquette.

07
Private Conversation

Questions Among Old Soldiers

1:41:301:47:426 min 12 sec

Azune and Teor compare what they know about Thjazi’s execution and the changes within Dol-Makjar. Their conversation reveals that Teor’s younger brother Cyd was meant to participate in the failed rescue but has disappeared.

6 relevant moments
08
Investigation Formed

Finding the Broken Link

1:54:332:02:157 min 42 sec

Azune and Occtis compare the failed stages of Thjazi’s rescue and realise that Thimble and Cyd are both missing. They recruit Teor and leave the Farramh to investigate Thimble’s secret hideout in the Tanners.

10 relevant moments
09
Investigation Discovery

Ransacked Hideout

2:02:152:10:298 min 14 sec

Azune, Occtis, and Teor discover that Thimble’s secret hideout has been violently searched. Following fresh blood and a fading otherworldly light, Teor finds Thimble unconscious inside a narrow drainage grate.

10 relevant moments
10
Rescue And Revelation

Thimble Between Life and Death

2:25:502:36:3010 min 40 sec

Teor saves the critically injured Thimble from death. After awakening and learning of Thjazi’s execution, Thimble reveals that she was attacked before delivering the escape glyph, while Azune confirms that the real glyph remains inside the hideout.

6 relevant moments
11
Investigation Reconstruction

Reconstructing the Failed Rescue

2:36:302:39:212 min 51 sec

Thimble remembers the masked figures who interrupted her before she could deliver the escape glyph. The survivors reconstruct each stage of the rescue plan and discover that the bodies of at least three attackers Thimble killed have been removed.

2 relevant moments
12
Character Arrival

Kattigan and Wulferic

2:39:212:47:328 min 11 sec

Kattigan Vale and his enormous wolf companion Wulferic appear at Thimble’s hideout. The old warrior reveals that he witnessed Thjazi’s execution, considered intervening, and followed Teor, Azune, and Occtis from the Farramh.

4 relevant moments
13
Investigation Breakthrough

The Crow Keepers’ Attack

2:47:322:58:5511 min 23 sec

Kattigan reconstructs the attack upon Thimble’s hideout and finds evidence pointing towards the Crow Keepers. Seven masked attackers entered expecting a fight, three were killed, and the survivors removed the bodies and stole the Stone of Nightsong.

2 relevant moments